
The Multiplane Camera
You Came Back 😍
My goodness, you’ve come back! I was beginning to worry. You see, I’ve been sitting here alone in the darkness of cyberspace, eagerly waiting to share more game dev stories with you. It’s basically my favorite thing to do.
If this is your first time here, welcome! Please, feel free to treat yourself to a heaping plateful of words from my last post where I talked about the wondrous experience of creating a business.
This week, I draw back the curtain even further to reveal the profound and inscrutable machinery at play in the creation of the background artwork for our first game, Voodoo Detective. I invite you to join me on a brief tour through The Chic Shell Hotel, a stunning beachside resort located on the tropical island of Zo Wanga.
So slap on those flip flops, lather up with sunscreen, and put on your tourist cap. We’re going on a vacation!
Our Style
Last week, I touched briefly on how our art style began to evolve from reference artwork, influential adventure games of yore, and the themes from our own story.
Games of Yore
Voodoo Detective is made in the image of the enchanting point-and-click adventure games that poured from the doors of studios like LucasArts and Sierra. It’s important to us that we remain faithful to that style. We want your experience playing Voodoo Detective to be one steeped in both the heady brew of nostalgia as well as the stimulating syrup of innovation.
Story Themes
We had a list of themes and influences we wanted to incorporate into the styling of our backgrounds. A dash of art deco here, a tablespoon of 1930s noir there, a fluid ounce of tropical island, and a hefty dollop of Voodoo to top it all off.
Where We Landed
We landed in lush fields of painterly whimsy and it is here that we begin our tour of The Chic Shell Hotel’s main lobby. We’ll start with its inception.
The Dossier
All of our backgrounds begin with a dossier of information handed over to the artist tackling that particular background. This “dossier” includes:
A layout diagram (rendered by yours truly)
A prompt describing the mood of that particular background
Visual references for the background
A list of all “interactable” items in the background
A list of “layers” within the background (eg. foreground elements, background elements, etc.)
In this case, The Chic Shell Hotel’s lobby is being painted by Josh Haberman, one of four mind-bendingly talented background artists working on Voodoo Detective. I can’t tell you how grateful I am to have found such wonderful people to work with. I simply lack the vocabulary. If Voodoo Detective is to be a work of art, no small degree of credit is due our spectacular artists (in fact, they probably deserve most of the credit).
Bruce Brenneise - Well, you’ve already met Bruce from the first blog post. He’s a swell fellow indeed.
Sam Key - You’ve not met Sam, but she’s a spectacularly talented artist. I wish I could share all of her backgrounds with you right this moment, but then you’d have nothing to look forward to when you play the game! Sam is a legend, a treasure, a wonderful human being, and a pleasure to work with indeed.
Ron Lemen - Ron’s another obscenely talented artist working on the game. He’s been doing some spooky work down at the cemetery on Zo Wanga that I can’t wait to share with you all. He’s an exemplary artist and has been a pleasure to work with.
Josh Haberman - I’ll be talking quite a bit about Josh’s work in this post, so I’ll stop here and just say that he’s a brilliant artist and a lovely person.
What follows is a summary of the contents of the dossier we gave Josh.
Diagram

As you can see, pretty crude, but it contains all the basic elements Eric and I had hoped to squeeze into this particular background.
Note: There is in fact a second Eric: my writing partner, Eric Ackerman, and not a figment of my imagination as explained in the first blog post.
Prompt / References
Eric and I can get pretty picky since we’re both naturally inclined towards perfectionism, but we try to give artists as much creative latitude as possible. Here is the prompt we wrote for the lobby:
It’s beautiful here. Similar resort vibe to the exterior [of the hotel]. Lavish, 1930’s vibe. There’s an elevator with a driver at the back of the room, a cool fountain (perhaps a merman coming out of a shell like Venus).
Old 1930’s hotel (like Tower of Terror, but not spooky and more hawaiian resort feel to it). Here’s another good example.
Tourists
As I said, we’re perfectionists. Nothing but the utmost exactitude from the two of us. Thanks to our meticulous direction, Josh had a lot to go on.
“Interactable” Items
Normally I would list out all the interactable items in the scene, but for the sake of preserving the secrets of the game, I shan’t be doing that here. You’ll just have to wait and find out! The list of items is useful in determining which aspects of the background need to be “layers.”
Layers

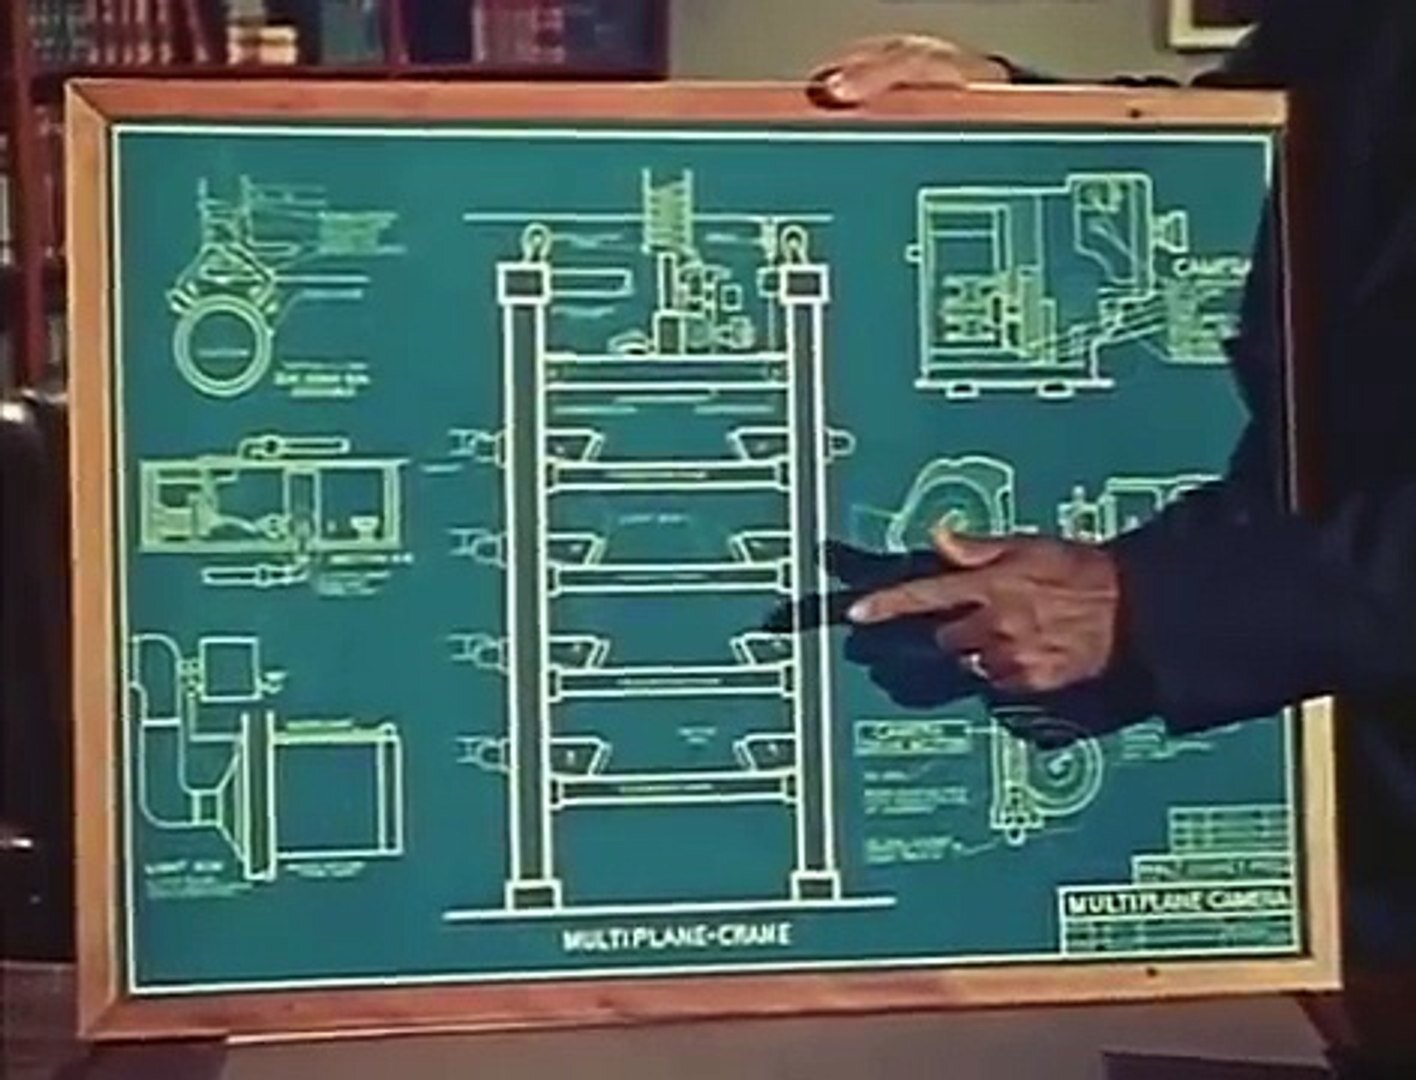
The title of this post is “The Multiplane Camera.” Walt Disney does a much better job than I explaining how a scene can be separated into its constituent elements according to their distances from the camera.
We do the exact same thing digitally in our game. While the game is not 3D, it does allow objects to pass in front of and behind one another based on their relative positions within the background.
When Josh began working on the lobby, we explained which elements of the background would reside at which distances from the camera so he could group them together in Photoshop as layers (our digital “Multiplane Camera,” so to speak). This is helpful for when I import the backgrounds into the game engine.
Sketching It Out
Begin: Quick Technical Side Note
I made the decision early on to make the game conform to a 16:9 aspect ratio. For all other screen sizes we slap on letter-boxes or pillar-bars. This makes it so our background/UI designers only have to worry about one camera size. It’s a huge productivity win since our game will be targeting many different devices.
End: Quick Technical Side Note
At this juncture, Josh bravely retrieved the dossier and set to work on his first sketch of the lobby. We had three rounds of feedback for this background and I’ll share the notes we gave at each interval.
Sketch 1

This is the first sketch Josh produced for the Lobby. As you can see, it’s quite beautiful even in the sketch phase. Praise unto Josh through whom such beautiful works of art flow.
We have some basic guidelines established for the composition of our backgrounds that we try our darndest to conform to. Here are a couple examples:
Every background needs to have clearly defined entrances and exits so the player knows how to enter/exit the scene without having to look around, sad and confused. In this case, the entrance to the lobby was situated at the bottom of the camera frame where there weren’t any visual cues to help the player find the exit.
The camera needs to be able to frame conversations at a distance appropriate to the level of intimacy expected from the conversation. If we expect to have an intimate conversation in a scene, we’d like to be able to see that interaction (on all devices). Based on this sketch, the expected interactions with the elevator driver would happen at the far rear of the scene. Voodoo Detective and the elevator driver would be tiny figures at the back of the lobby.
Sketch 2

This iteration does a much better job establishing the entrance with light shining through the front door. That said, the entrance is still too obscure.
Also, while the elevator is now closer to the camera, the front desk has receded into the background and we don’t want to shrink our interactions with the front desk clerk any more than we want to shrink our interactions with the elevator driver.
Sketch 3

Ahh, that’s much better! Both the front desk and the elevator are reasonably close to the camera and the entrance is clearly visible at the back of the room. It was at this stage that we all decided we were happy with the layout of the lobby.
The Lobby!

The lobby isn’t actually finished yet! What am I doing taking our guests on a tour while the paint is still wet? Well, I’m just that kind of guy. Here is the latest iteration. It’s very close to being completed and we’re all super excited with how it came out. Really awesome work from Josh (one more link to his work for good measure).
Rest Your Weary Eyes
I have so much more to say, but I think what I’ve got here covers the basics of what I wanted to share about our background design process.
Thank you all so much for reading! I’ve got lots more to share with you over the coming weeks and I hope you’ll all stop by again. I’ll be here, eagerly awaiting your return.

Love,
Eric Fulton
P.S. A huge thank you to Eric Ackerman for editing this one! You should have seen it before. Woof.